Post-processing effects
Wasabi2d provides a small number of pre-defined full-screen post processing effects. These are defined at the layer level, and affect items in that layer only.
- Layer.set_effect(name, **kwargs)
Set the effect for the layer to the given name. Return an object that can be used to set the parameters of the effect.
- Layer.clear_effect()
Remove the active effect.
Available effects
The effects are described here as separate calls:
- Layer.set_effect('bloom', radius: float=10, gamma: float = 1.0, intensity: float = 0.5)
Create a light bloom effect, where very bright pixels glow, making them look exceptionally bright. The radius controls how far the effect reaches.
New in version 1.3.0: Added the gamma and intensity parameters.
- Layer.set_effect('trails', fade: float=0.9, alpha: float = 1.0)
Apply a “motion blur” effect. Fade is the fraction of the full brightness that is visible after 1 second.
Alpha is the overall intensity of the effect.
- Layer.set_effect('punch', factor: float=1.0)
Apply a pinch/punch effect.
A factor greater than 1.0 creates a “punch” effect; objects near the center of the camera are enlarged and objects at the edge are shrunk.
A factor less than 1.0 creates a “pinch” effect; objects near the center of the camera are shrunk and objects at the edge are enlarged.
- Layer.set_effect('blur', radius: float=10.0)
Apply a full screen gaussian blur.
radiusis the maximum radius of the blur.The effect runs on the GPU but larger radiuses are more costly to compute. The cost of the effect is O(radius).
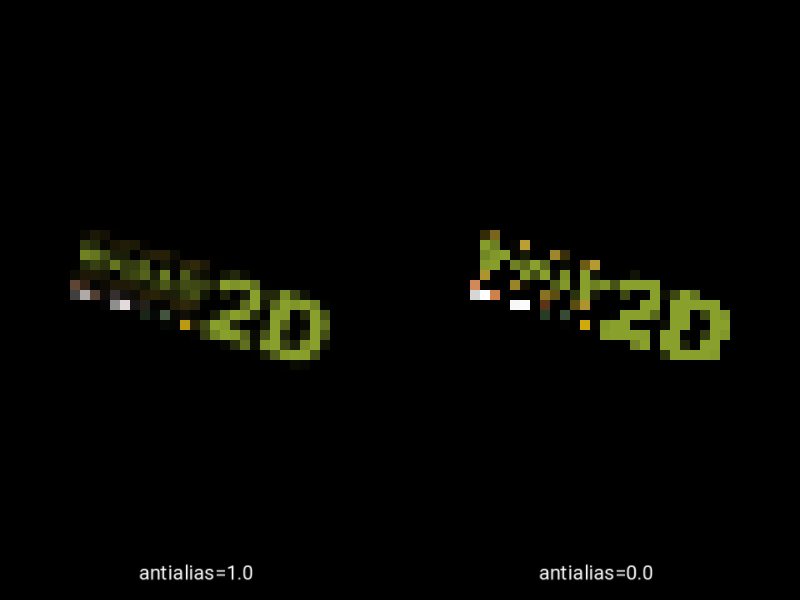
- Layer.set_effect('pixellate', pxsize: int=10, antialias: float=1.0)
Pixellate the contents of the layer.
pxsizeis the output pixel size.By default, this effect computes the average value within each pixel, ie. antialiases as it downsamples.
For a more retro look, disable the antialiasing by passing
antialias=0. Values between 0 and 1 will give a weaker antialiasing effect; values greater than 1 give an even more blurred look.The effect runs on the GPU but with antialiasing, larger pxsizes are more costly to compute. The cost of the effect is O(pxsize * antialias).
New in version 1.3.0.
- Layer.set_effect('dropshadow', radius: float=10.0, opacity: float=1.0, offset: Tuple[float, float]=(1.0, 1.0))
Apply a drop-shadow effect: draw an offset, blurred copy layer underneath the normal layer contents.
- Parameters
radius – The maximum radius of the blur.
opacity – The opacity of the shadow; 1.0 is black, lower values make the shadow partially transparent.
offset – The offset of the shadow in screen pixels.
(1, 1)offsets the shadow downwards and to the right. Note that this is a screen-space effect and these coordinates are always in screen space.
New in version 1.1.0.
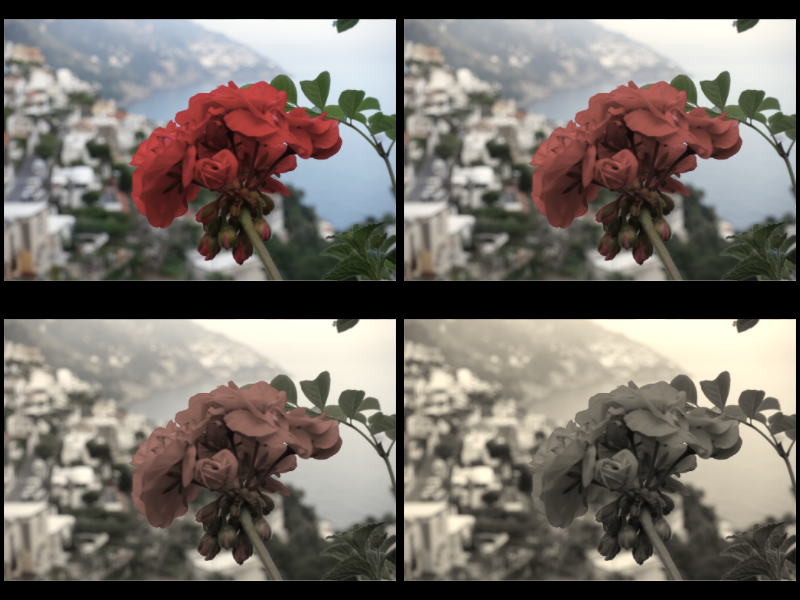
- Layer.set_effect('greyscale', amount: float=1.0)
Convert colours to greyscale or partially desaturate them.
- Parameters
amount – The fraction of the colour to remove; 0.0 means keep full colour, while 1.0 is fully black and white.
New in version 1.3.0.
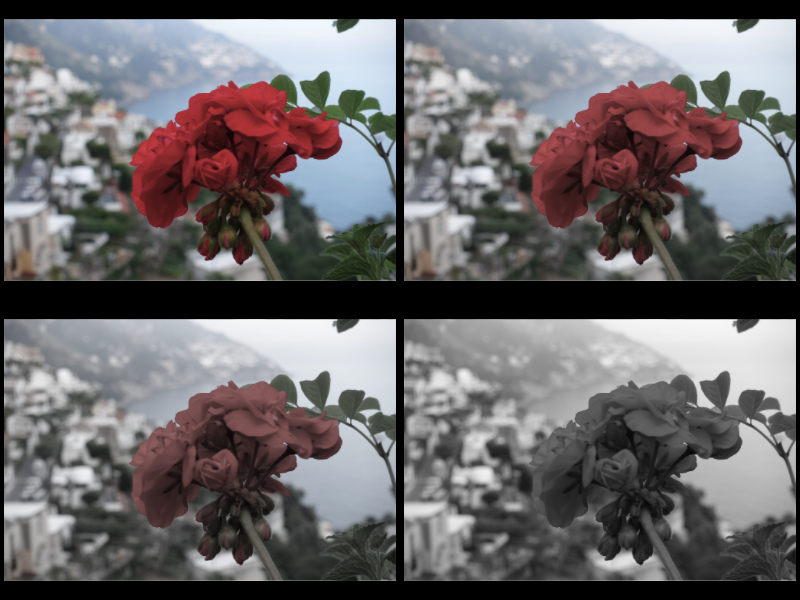
- Layer.set_effect('sepia', amount: float=1.0)
Convert colours to sepia.
Sepia is similar to greyscale effect in that it desaturates, but the sepia spectrum is slightly warmer, like an old photograph.
- Parameters
amount – The fraction of the colour to remove; 0.0 means keep full colour, while 1.0 is fully sepia.
New in version 1.3.0.
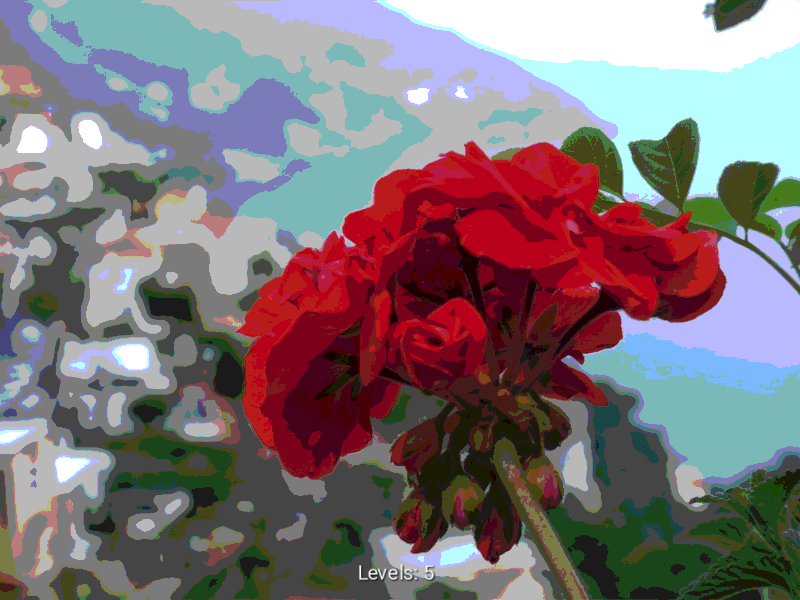
- Layer.set_effect('posterize', levels: int=2, gamma: float=0.7)
Map colours to a reduced palette.
levelsspecifies the number of levels in each channel to reduce to (plus 0); the total number of colours will belevels ** 3. For example, withlevels=2the colours will be black, red, green, blue, yellow, cyan, magenta and white.gammadeserves particular attention.gammais applied when calculating how the levels fall in the[0, 1]interval. Whengamma=1, levels will fall at regular intervals. Gamma less than 1 dedicates more bands to dark colours, and few bands to light colours; gamma greater than 1 dedicates more bands to light colours, and more to dark colours. The overall brightness of the image does not change so much, but these can give very different effects, perhaps suiting different graphic styles.- Parameters
levels – The number of levels in each channel.
gamma – A power expressing the spacing of the levels.
New in version 1.3.0.
Tip
Effects Examples
Each effect has an interactive example in the examples/effects/
directory in the wasabi2d repository.
Try cloning this repository and running the examples in order to better understand the effects.
The Chain
New in version 1.3.0.
So far we’ve seen effects that apply to just one layer. This is a pretty quick way to get impressive results.
However, this system is limited to acting on one layer at a time, and one effect at a time.
To better customise rendering, we need to take a different approach; this is called the chain.
- scene.chain
A list of ChainNodes that define how the scene is rendered. The list is rendered in order, so later items render on top of earlier items.
The default value for a new scene is:
scene.chain = [wasabi2d.chain.LayerRange()]
This gives the default strategy for rendering the scene: to simply render all layers from back (lowest id) to front (highest id). This is implemented by the LayerRange node:
- class wasabi2d.chain.LayerRange(start: Optional[int] = None, stop: Optional[int] = None)
Render a range of layers, in order of lowest id to highest id.
Only existing layers are rendered; any that do not are skipped - but will be rendered as soon as they are created.
Unlike range(), start and stop are inclusive.
There’s a similar class that makes it easier to nominate specific layers:
- class wasabi2d.chain.Layers(layers: List[int])
Render specific layers in the specified order.
Only existing layers are rendered; any that do not are skipped - but will be rendered as soon as they are created.
Each of these classes subclasses ChainNode, which means that they can be wrapped in an effect. Effects can also be wrapped in effects.
- class wasabi2d.chain.ChainNode
Mix-in class for chain nodes to wrap them in an additional effect.
- wrap_effect(name: str, **parameters) Effect
Wrap this layer range in an effect.
The name and parameters are identical to
Layer.set_effect().This is a shortcut for constructing the effect object directly.
- Parameters
name – The name of an effect to enable.
parameters – Parameters to control the effect.
- Returns
An Effect object, which can be used to change parameters for the effect, or to wrap this effect in another effect.
Tip
Layers are, fundamentally, for organising primitives. The chain is for configuring how the scene renders, even as layers come and go.
Layer effects straddle this: they apply to layers, but affect how the scene renders. Think of this as a convenience - a way of getting started with effects, before putting them onto the chain.
Chain-Only Effects
In addition to applying the above effects, some effects can only be applied via the chain.
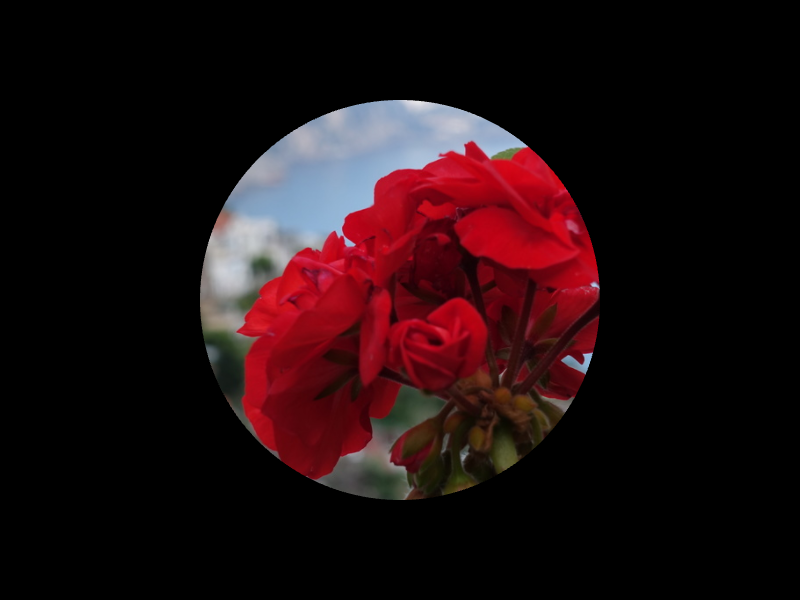
- class wasabi2d.chain.Mask
Paint one node,
paintmasked by another node, themask. By default, the paint layer is drawn where the mask is opaque; other functions are available.- paint
A chain node that will be painted, subject to the mask.
- mask
A chain node that forms the mask. Only the alpha channel from this node is used.
- function
One of
inside,outside, orluminance. Defines what aspect of the mask layer is used to calculate the alpha channel:inside- draw the paint layer where the mask is opaque.outside- draw the paint layer where the mask is transparent.luminance- draw the paint layer with more opacity where the mask is bright (white), and more transparency where it is dark.
For example:
scene.chain = [
    w2d.chain.Mask(
        w2d.chain.Layers([1]),
        w2d.chain.LayerRange(stop=0),
    )
]
This code uses layer 1 as a mask for all layers 0 and below. Now if we put an opaque circle on layer 1, and a photo on layer 0:
scene.layers[0].add_sprite('positano', pos=center)
scene.layers[1].add_circle(radius=200, pos=center)
It renders like this:
- class wasabi2d.chain.DisplacementMap
Paint one node,
paintoffset by the image given by thedisplacementnode.The colour channels of the displacement layer give the offset to displace by; the alpha channel selects how much of the paint layer to show (much like a mask).
By default, the red channel of the displacement layer controls x offset, while the green channel controls y offset. This can be overridden by setting the
x_channelandy_channelattributes.The value of the offset is calculated as distance from the 0.5 mid-point. A mid grey -
#7f7f7f- represents no offset.- paint
A chain node that will be painted, subject to the mask.
- displacement
A chain node that gives the displacement (And alpha value).
- scale
A float; the distance that is offset at maximum.
- x_channel
Either
'r','g', or'b': the channel that gives the offset in the x direction.
- y_channel
Either
'r','g', or'b': the channel that gives the offset in the y direction.
For example:
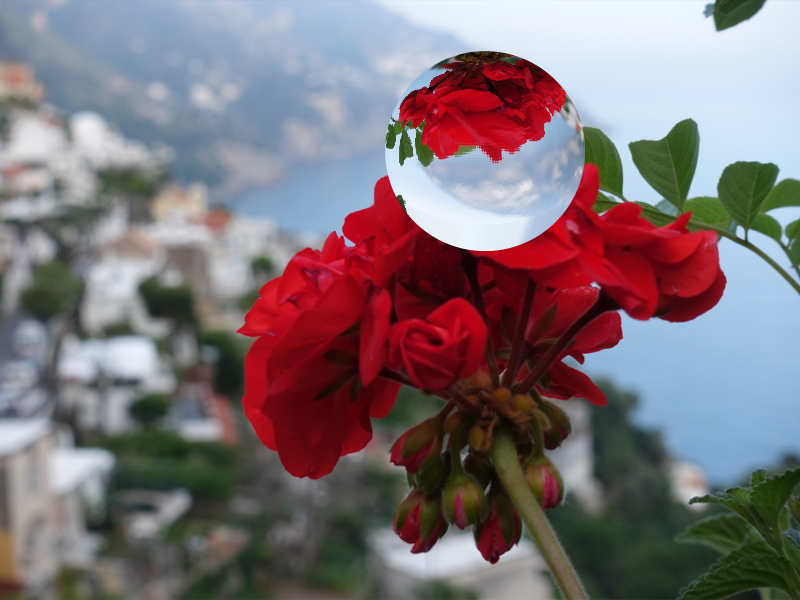
scene.chain = [
    w2d.chain.LayerRange(stop=0),
    w2d.chain.DisplacementMap(
        displacement=w2d.chain.Layers([1]),
        paint=w2d.chain.LayerRange(stop=0),
        scale=400
    )
]
This code renders layers below 0 normally, as well as drawing layer 1 with a “refraction” of those layers.
A displacement map that gives a lens-like effect might be this one:
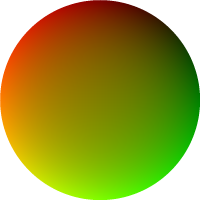
It renders like this:
- class wasabi2d.chain.Fill
Fill the scene with a colour.
Overwrites everything, even if the colour given has partial transparency.
This is primarily useful as input to an effect like Mask.
- color
The colour that will be used to fill the buffer.
- class wasabi2d.chain.Light
New in version 1.5.0.
Use one input as a light map to light the other input.
- light
A chain node that contains the light map. Primitives in these layers will be drawn with additive blending.
- diffuse
A chain node that is the base image to be lit.
- ambient
A colour which gives the ambient light level, ie. the amount of the diffuse input which is visible even if there are no lights.
This defaults to black, ie. pitch black.
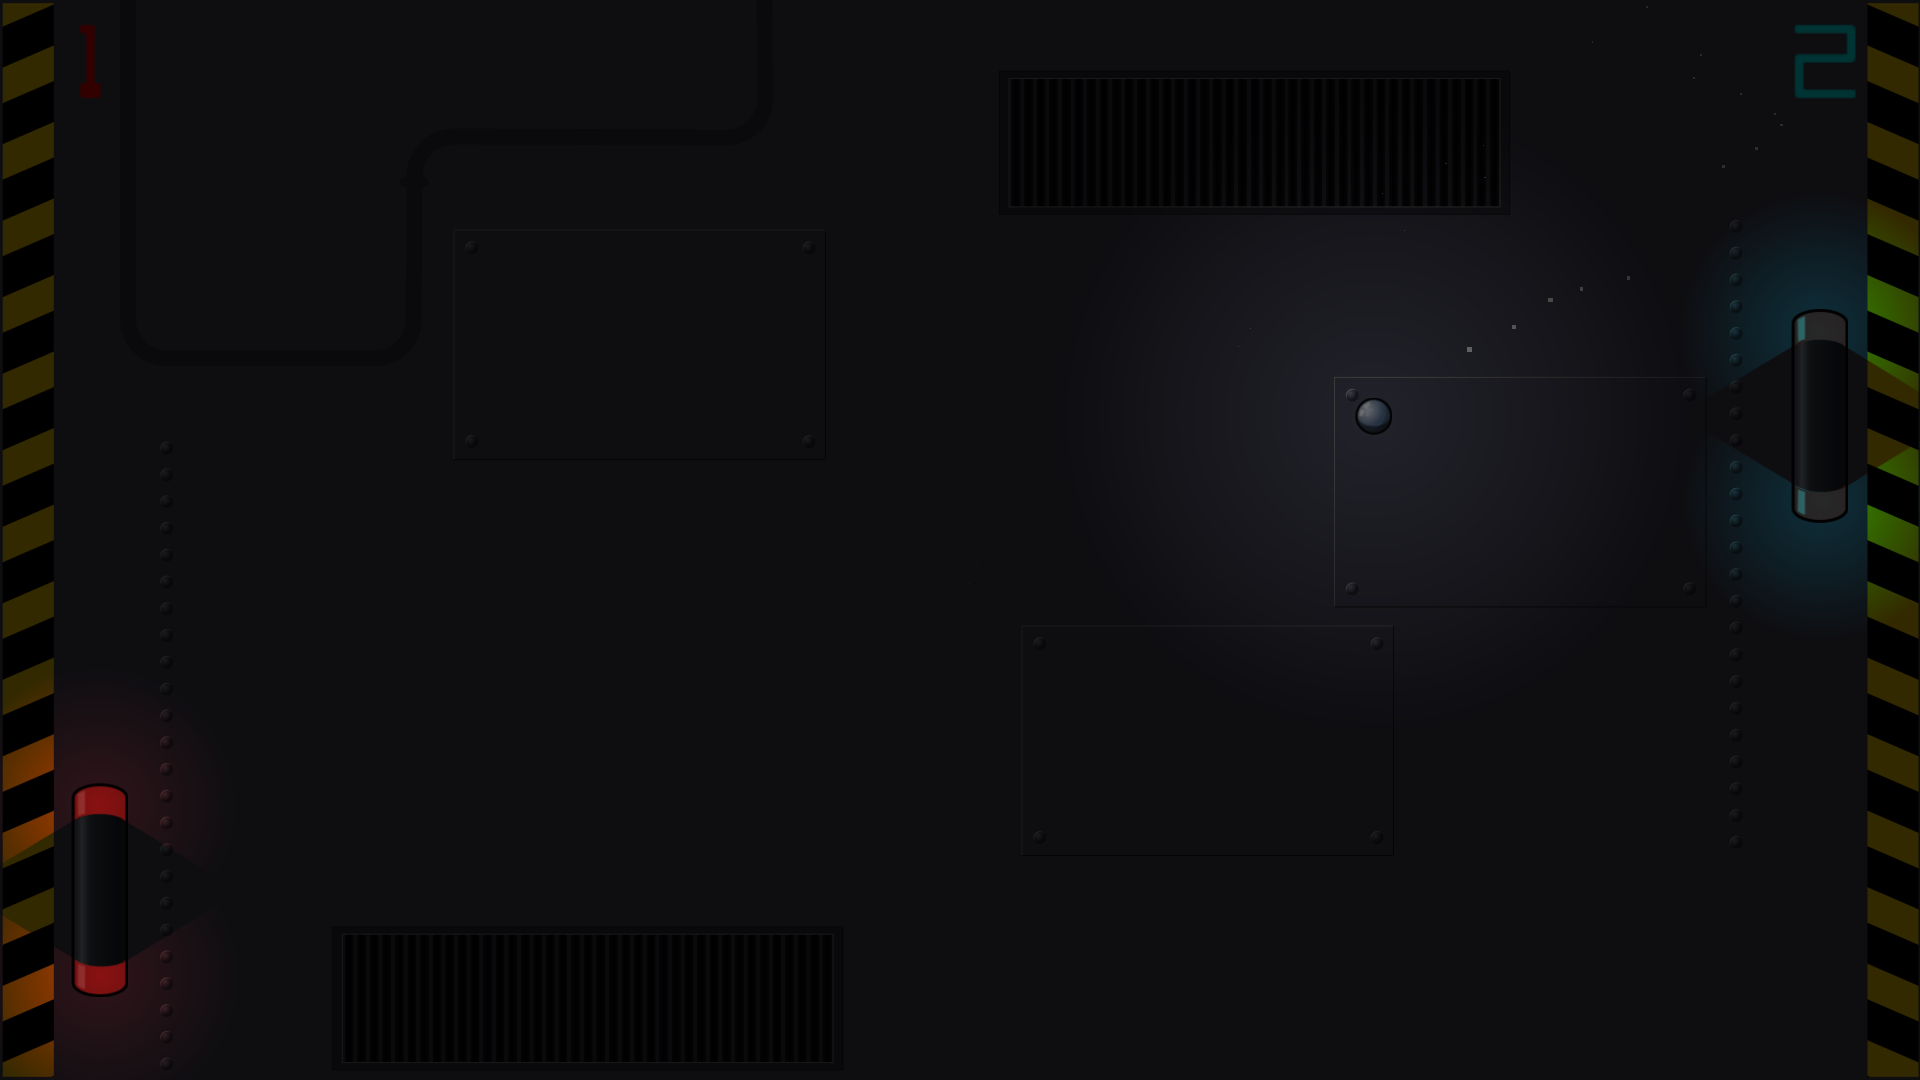
As a worked example, we might set up a chain effect that defines a single light layer (layer 99), that lights all layers up to and including layer 1:
scene.chain = [
    chain.Light(
        light=99,
        diffuse=chain.LayerRange(stop=1),
        ambient='#333333'
    ),
]
The lights can be sprites. We need some special sprites for this. Here are some examples. These work as is (black means no light), or you can use images with an alpha channel.
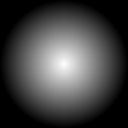
A sprite that is suitable as a point light.
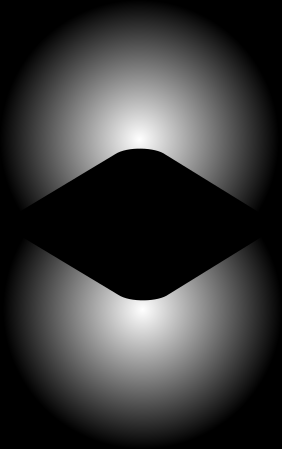
This sprite represents the light pool cast by a bat in the Pong example.
The Pong example, which can be found in
examples/pongin the repository, illustrates this lighting effect, with shaped lights on the bat and a point light that tracks the ball.