The Scene
-
class
wasabi2d.Scene(width: int = 800, height: int = 600, title: int = 'wasabi2d', *, fullscreen: bool = False, icon: str = None, rootdir: Optional[str] = None, scaler: Optional[Union[str, bool]] = False, background: Union[str, Tuple[float, float, float]] = 'black', pixel_art: bool = False)¶ Top-level interface for renderable objects.
- Parameters
width – The width of the window to create, in pixels.
height – The height of the window to create, in pixels.
rootdir – The root directory to load for asset loading. Images will be loaded from the
images/directory inside rootdir, for example, and corresponding directories for sounds, fonts, and music.title – The initial window title.
icon – The icon for the window, as an image name without extension.
scaler – If True or a string, activate scene scaling using the named scaler, or ‘nearest’ if
Trueis given.background – An initial setting for the
background.pixel_art – If True, turn off texture filtering globally. This makes pixels look square. See Pixel Art.
New in version 1.4.0: Added the background and pixel_art parameters.
The Scene object represents the whole graphics subsystem in wasabi2d. Scenes manage a collection of graphical primitives within a number of layers.
Create a scene with:
from wasabi2d import Scene

scene = Scene(width, height)
-
Scene.background¶ Get/set the background color of the entire scene as an RGB triple. (1, 1, 1) is white and (0, 0, 0) is black.
You can also assign color names or HTML color codes (but the value is stored and returned as a tuple).
-
Scene.layers¶ The collection of layers that will be drawn. Layers are created on access and do not need to be explicitly declared.
Layers are drawn from back to front - lowest layer number to highest.
-
Scene.title¶ Get/set the caption for the window.
-
Scene.width¶ (read-only) The width of the scene in pixels.
-
Scene.height¶ (read-only) The height of the scene in pixels.
There’s also an off-screen version, which will mainly be useful for testing and screenshotting:
-
class
wasabi2d.scene.HeadlessScene(width: int = 800, height: int = 600, rootdir: Optional[str] = None)¶ A scene that doesn’t create a window.
This can be used in automated applications and for testing.
Pixel Art
New in version 1.4.0.
Setting pixel_art=True in the scene constructor turns off bilinear
interpolation of textures. This means that pixel edges will be clearly
visible and pixels will appear square, but may be rotated.
This is slightly different to Scene scaling, which applies filtering at a higher level. In particular, scene scaling affects Post-processing effects while pixel_art mode does not. The two options can be used together or not.
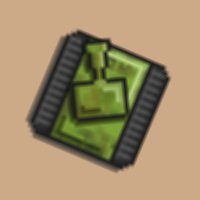
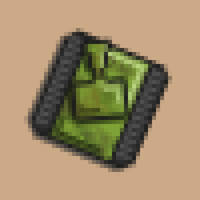
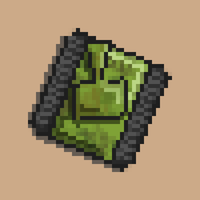
Here are some examples of how sprites appear when zoomed. These differences will be less visible without magnification.
|
|
|
|
|
|
|
|
Scene scaling
Caution
This will currently mess up things like mouse events due to the mouse pointer not matching the position of your cursor. See this.
Scene scaling allows the wasabi2d scene to be scaled independently of the final window size. Two uses of this are:
Supporting high dpi/retina displays with practically the same performance as standard displays (but reduced quality).
Retro games, in order to draw everything pixellated.
The scene will aways have the requested dimensions, but the window will usually be a bigger size; the biggest integer multiple that fits your screen. The scaler in use determines how the scene is upscaled to the window.
To use this, set scaler to one of:
Trueor'nearest'- nearest pixel; creates a pixellated appearance. Ideal for retro games.'linear'- linearly interpolate between pixel values.
For example, to create a retro game with a 200x100 pixel screen (very blocky
indeed), create a scene with a small viewport size, but set scaler to
True:
scene = Scene(
    width=200,
    height=120,
    scaler=True
)
This will create a scene that is logically 200x120:
All rendering will take place on a 200x120 frame buffer.
Mouse coordinates will be correctly translated to scene coordinates, eg. the bottom right corner is
(199, 119).
Coordinate system
Unusually for an OpenGL-based game engine, wasabi2d uses Pygame’s coordinate system where the top of the screen has coordinate 0 and coordinates increase downwards.
This allows easier porting of Pygame Zero games.
By default distances are measured in screen pixels.
Camera
The camera for the scene is scene.camera.
-
wasabi2d.scene.Camera.pos¶ Get/set the center position of the camera, as a 2D vector/pair of floats.
Initially, this is
(scene.width / 2, scene.height / 2).
-
Camera.screen_shake(dist=25)¶ Trigger a screen shake effect.
The camera will be offset from
.posbydistin a random direction; then steady itself in a damped harmonic motion.Trigger a screen shake effect.
The camera will be offset from
.posbydistin a random direction; then steady itself in a damped harmonic motion.The effect is added to the value of
.pos; getting/setting pos moves the camera independently of the shake effect.
Screenshot and Video Recording
Games automatically have access to screenshot and video recording capabilities.
This is hard coded to:
F12- take a screenshot, named with an automatic filename.Shift-F12- start/stop recording a video, named with an automatic filename.
New in version 1.3.0: Hard-coded screenshot/video capture to F12.
Recording video requires ffmpeg to be installed and on the $PATH.
As well as this, you can use these features programmatically:
-
Scene.screenshot(filename: Optional[str] = None) → str¶ Take a screenshot.
If filename is not given, save to a file named screenshot_<time>.png in the current directory. Return the filename.
-
Scene.record_video(filename=None)¶ Start recording a video.
Video will be encoded in MPEG4 format.
This requires an ffmpeg binary to be located on $PATH.
If filename is not given, save to a file named video_<time>.mp4 in the current directory.
-
Scene.stop_recording()¶ Finish recording the current video.
-
Scene.toggle_recording() → bool¶ Start or stop recording video.
Return True if recording started.